Who doesn’t love salami? Sliced thinly on a sandwich with good bread, or chunked on a delicious cheese plate, it’s one of our favorite charcuterie items. We even had it on a pizza once when we were visiting Rome. While many claim to dislike the fatty, salty salume, we’re not afraid to admit that salt with fat is among our most-preferred food combinations, and we especially enjoy this pairing in salami, which we pretty much always have in the fridge. So when Mrs. Wheelbarrow declared that November’s Charcutepalooza challenge was curing, which involves a recap of two prior challenges — grinding and stuffing — with the addition of a whole new endeavor — fermenting — there was never any doubt in our minds that we would make salami. Dan was so excited about this new challenge that he convinced me to buy a wine fridge to use as a curing chamber (more on that later.) I became less excited (and more than a little apprehensive) when I learned that salami is essentially ground raw pork, seasoned with spices and beneficial bacteria, then hung in a cool and humid environment for a few weeks to cure. No, you did not miss the step where the raw pork is cooked — it isn’t. As much as I love salami, I never really stopped to think about how it is made, or even really what it is, when eating it. We’ve learned a lot from the Charcutepalooza challenges this year, and a greater appreciation for the origins of food and the process of getting it to the table is chief among our new-found charcuterie skill set. As always, we owe a special shout-out to the Charcutepalooza founders, Mrs. Wheelbarrow and The Yummy Mummy for creating this “year of meat” and getting us to try new things in the kitchen each month. Thanks to you guys, we may never eat store-bought salami again!
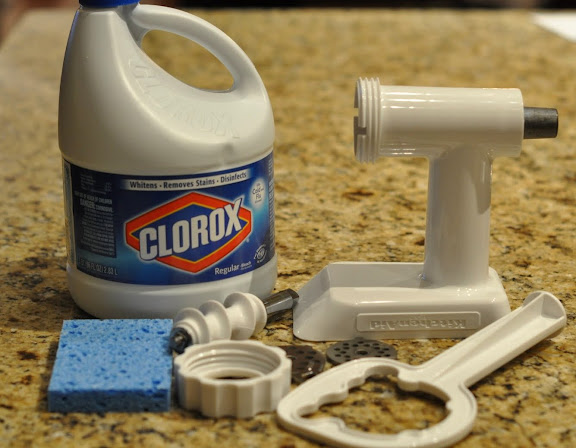
By now, grinding meat for cooking at home is old hat. We do it all the time. While the process itself has become easy, I never forget that it involves finely chopped pieces of raw meat potentially getting strewn about the kitchen, so cleanliness is always a priority. Keeping all the parts involved in the grinding process clean was even more important for this challenge, because the raw pork being ground up was going to be cured instead of cooked, thereby increasing the potential for bad bacteria to grow during the curing time. I usually leave much of the research part of these challenges up to Dan, who enjoys reading about cooking almost as much as cooking itself. But this time I decided to attempt to assuage my concerns about the whole “raw pork” thing by reading the back story portion of the dry-cured meats chapter in our charcuterie guidebook. The fact that the authors devoted multiple pages to “essentials and safety issues” and included a special section titled “How Real is the Danger of Botulism?” did not necessarily make me feel any less terrified concerned. Accordingly, I took the suggestion to “[u]se a bleach solution to sanitize your grinder, stuffer, work surface, and sponge” very seriously.
The authors reiterate the need to use clean equipment: “because of the warm, moist conditions involved with dry-curing foods, bacteria can multiply with abandon, so sanitation is a much more salient concern than when working with food that will be cooked or eaten immediately.” I almost had to go buy another container of bleach. All kidding aside, “not very” is the answer to the question of how real is the botulism danger, assuming the appropriate sanitation steps are taken. So we followed the recommendation to use one capful of bleach per quart of water to sanitize all our equipment. (And I may or may not have reminded Dan to wash his hands at least 20 times during the grinding process.)
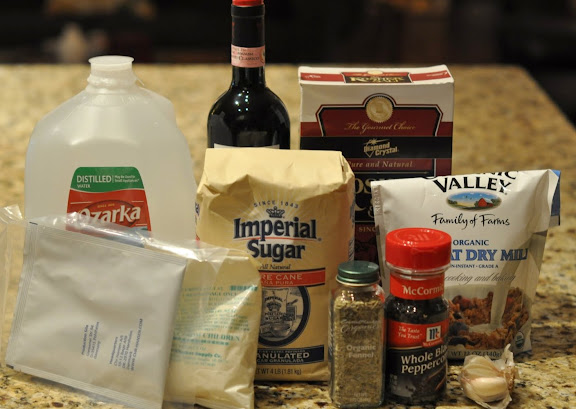
We used the Charcuterie book’s recipe for “Tuscan Salami,” the ingredients for which include kosher salt, distilled water, nonfat dry milk powder, dextrose (we couldn’t find it so we used sugar), fennel seeds, ground black pepper, garlic and dry red wine, as well as the special curing ingredients — DQ Curing Salt #2 (pink salt with nitrate), Bactoferm F-RM-52 (a live starter culture.) Although the curing ingredients are not available in your local grocery store, they are readily available online, are inexpensive, and last a really long time (we actually already had the pink salt from our bacon adventure.) The recipe also calls for diced pork back fat and boneless pork shoulder butt. Rather than buying pork back fat separately, Dan simply cut the fat off the pork shoulder and used that as the “back fat” portion of the salami. To further attempt to avoid the slim chance of food poisoning, we cut the pork into big chunks and froze them for about three weeks. This step may not have been totally necessary, but we figured that anything we could do to decrease the potential that “bacteria can multiply with abandon” was worthwhile.
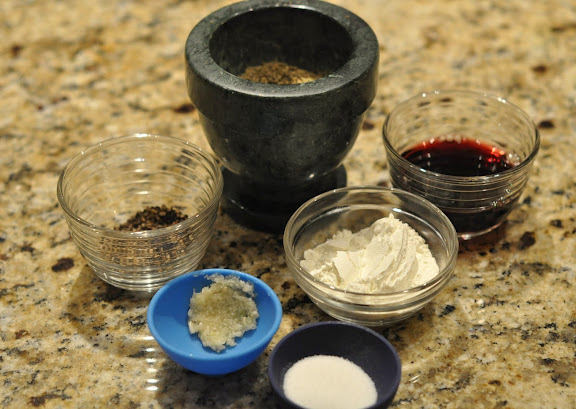
Before we began the meat-grinding process, we assembled all the ingredients to be added to the ground pork: coarsely ground black pepper, toasted and cracked fennel seeds, dry red wine, milk powder, Kosher salt, and minced garlic. We’ve learned throughout this past year that you really must get all of your ingredients measured out and prepared ahead of time. One of the secrets to successful sausage-making (and sickness-avoiding) is keeping the meat and grinder as cold as possible and moving quickly. (I do believe Dan sweetly encouraged me to “Pick up the pace!” almost as many times as I gently suggested that he wash his hands.)
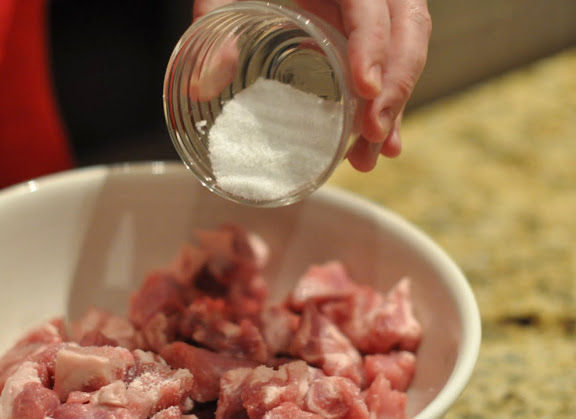
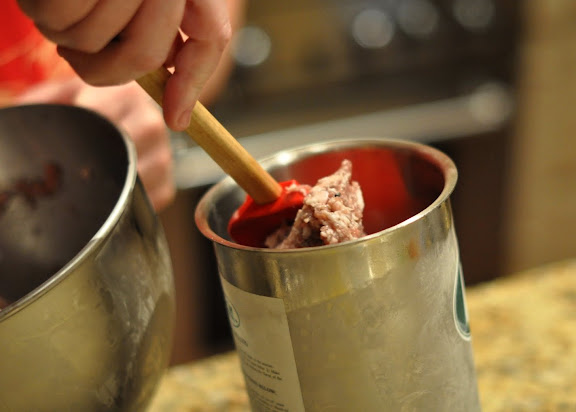
While the pork is still very cold, combine it with the curing salt. (I left out the picture of Dan mixing the raw pork chunks by hand. You’re welcome.)
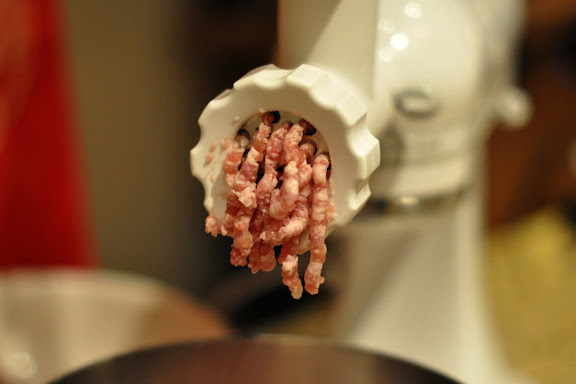
Grind the pork through the small die into a bowl sitting in another bowl of ice. We ground the pork shoulder itself and the pork shoulder fat separately, which would eventually create the little white pieces in the finished product to give it that authentic salami look.
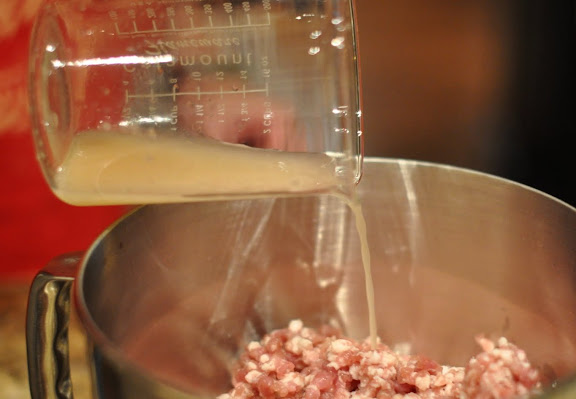
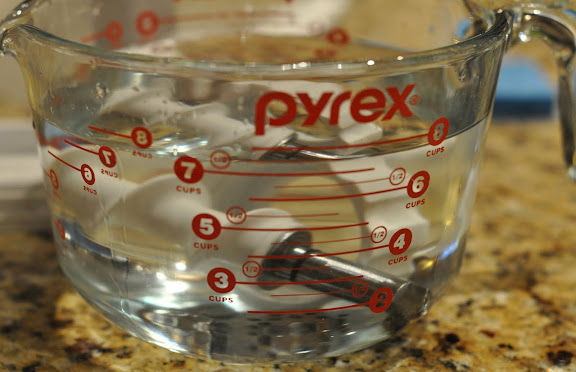
Dissolve the Bactoferm in the distilled water and add it to the ground meat. Then add the other assembled ingredients and mix everything together with the KitchenAid paddle attachment for about a minute.
Working quickly, pack the ground meat into the sausage stuffing device (which has also spent some time in the freezer) and stuff the casings.
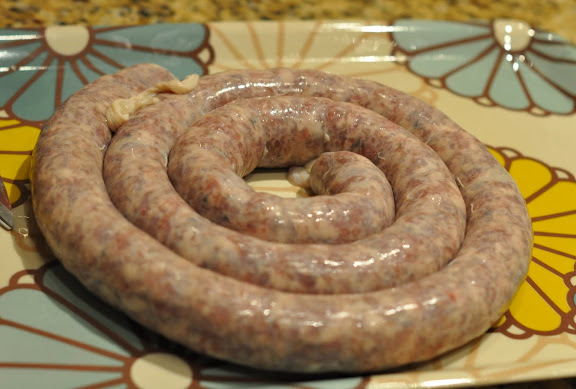
Stuffing the meat mixture into the casings is a two person job, but we’ve done it so many times this year that it’s pretty easy (and we realize you probably don’t want to see any additional pictures of the less-than-appealing process.)
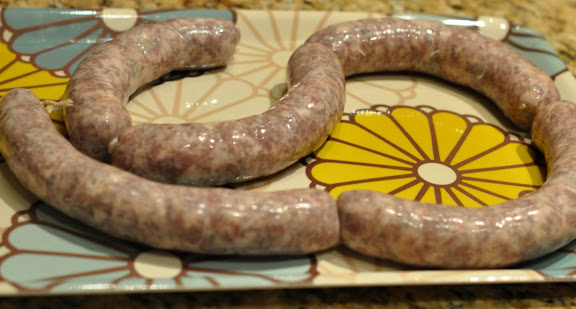
Next, twist the salami sausages into links. We did nine-inch links, five in all. This is almost the most tricky part, in my opinion, because it involves math.
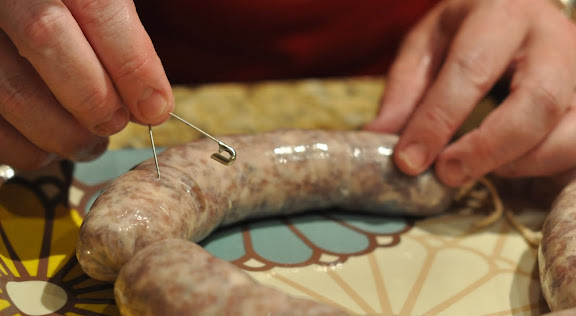
Use a sterilized safety pin to release any air pockets prior to curing the salami.

Because the recipe only calls for a few ounces of wine, we enjoyed the leftover portion of the nice Chianti we used in the salami to celebrate yet another Charcutepalooza challenge completed. Our work for the challenge was done — time for the curing agents to take over. (No wine straws were used in the making of this salami — we were too nervous about getting it all done quickly and toasted ourselves only after we got the salami safely in the fridge.)
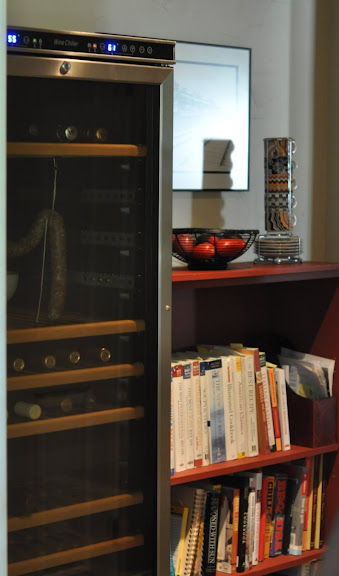
Speaking of which, a new Charcutepalooza challenge calls for a new cooking “toy,” no? Dan would say yes. The salami needed to cure in an environment ideally between 55-60 degrees with 60-70 percent humidity. In Texas, this environment does not exist, at least not with any consistency. As synchronicity would have it, we enjoyed a spectacular trip to Napa Valley this past summer and ended up ordering a few cases of wine. So we decided to buy a wine fridge to hold these and future wine purchases. Upon reflection, I think that Dan’s excitement about the wine fridge had nothing to do with wine and everything to do with having an ideal “curing chamber” in our home. He’s sneaky like that. No matter that we had to get the “dual-zone” model (the ideal environment for curing meats is not ideal for red wine), and the fridge is so big that we had to hire a mover to get it into the house and in its place next to our cookbooks in the nook outside our pantry — Dan has his curing chamber and I now have a “wine foyer.”
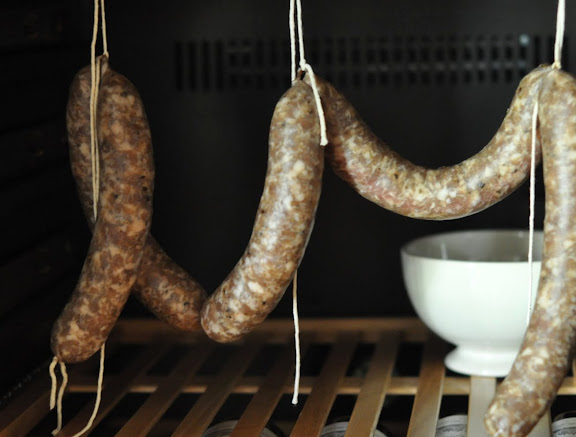
Using binder clips, kitchen twine and the slats on the wooden shelves in the wine fridge, Dan MacGyver’ed the perfect system for hanging the salami. He added a bowl of salty water to help increase the humidity, programmed the top zone of the fridge to the ideal temperature and we were all set.
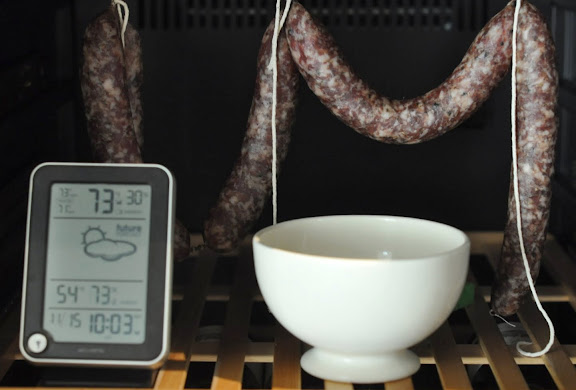
Here’s how the salami looked after a week. Note the change in color and how it’s starting to look like “real” salami. Never one to pass up an opportunity to incorporate additional technology, Dan placed our weather station (the “toy” he purchased for the very first Charcutepalooza challenge) into the wine fridge to more accurately keep track of the temperature and humidity. The reading on the bottom of the device shows the stats for the environment in the fridge — 54 degrees and 73 percent humidity. Perfect. Contrary to what you might expect, the reading on the top of the weather station shows not the temperature and humidity level outside, but the environment inside our guest room closet (the potential curing chamber we considered prior to the purchase of the wine fridge.) If I want to know what the temperature is outside, I just check weather.com. Or go outside.
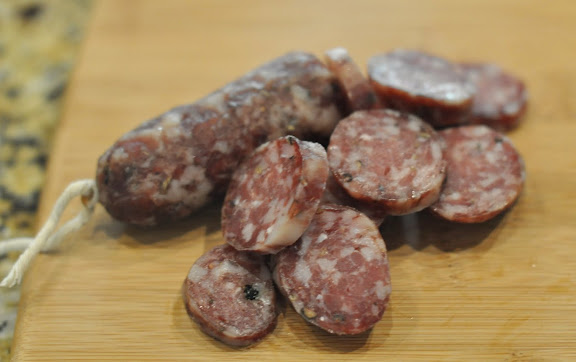
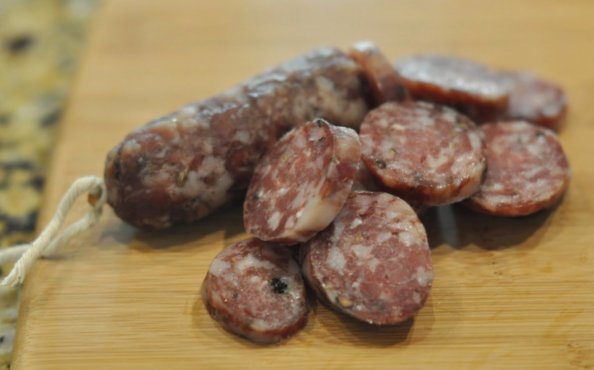
After 16 days in the wine refrigerator curing chamber, we decided that the salami was ready. The best way to determine when home-cured salami is done is to weigh it — it’s done when it has lost about 30% of its starting weight. Of course, employing this method requires that you also weigh the salami at the beginning of the curing process, in order to calculate the lost percentage. Unfortunately, we forgot this handy tip until a few days after the salami had been hanging in the fridge, so we decided to use the super-scientific technique of determining that it was done when it “felt” like regular store-bought salami. And it looked like “real” salami, so it must be done. Despite Dan’s confidence, I’ll admit I was still a little nervous about whether or not we made it correctly.
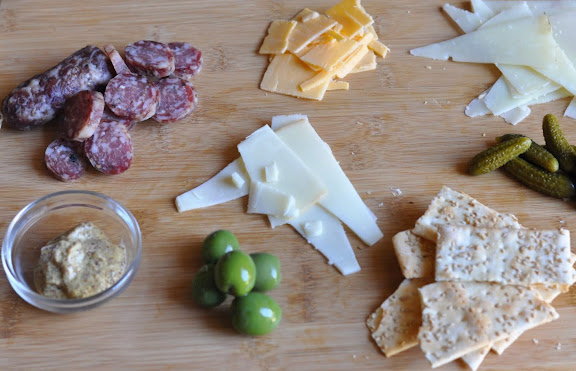
Considering that the unlikely, but still slightly possible, outcome of not doing it right could be pretty serious food poisoning, we opted not to bring it to our family gathering for Thanksgiving, choosing instead to try the first few bites ourselves in the comfort of our own home (with our own bathrooms) on a simple cheese plate with manchego, a sharp cheddar and a mild white cheese, good mustard, castelvetrano olives and cornichons. We were delighted to discover that not only was the salami “done,” it was really good! It was slightly salty with a strong fennel taste (who knew that fennel is largely what makes salami taste like salami) and an excellent meat-to-fat ratio. But the very best part? It didn’t make us sick at all. Success! With yet another charcuterie accomplishment under our belts (and a curing chamber in our home), we look forward to trying additional variations on the dry-cure method in the future. Friends and Family Members — this likely means charcuterie gifts for you next holiday season…
Lovely pictures. I’m hooked on home-cured salami now too! What a fun year it’s been in the kitchen!
That looks great. I also use my wine fridge for aging meat and cheese. I’d rather have a basement, but we make do pretty well. The weather station is a nifty toy. I want one.
I’ve used wine straws before- but i found they were difficult to clean. I think simply straws makes a better product- mostly because it comes with a pipe cleaner, and better looking case. just my opinion http://bit.ly/simplystraws
I know this has been posted a long time ago, but hoping you are still reading posts.
I want to buy a small wine cooler, but I am thinking about the humidity that is needed, how did you regulate this, I know with the salt water. but where you just taking it in and out as needed?
did your machine have any other system for this?
Hi Andrew,
Dan says the way he regulated the humidity was to keep a small weather station in the fridge to get the humidity readings, then he adjusted the amount of water as needed (he didn’t need to adjust it much – just added a bit as it evaporated). Our wine fridge does not have any separate mechanism for regulating or measuring humidity. Good luck – hope that helps!
Hi, this is awesome! I always understood that ventilation was also important in the curing process. Is this an issue using a wine cooler?
Hi Darcy,
When we did the salami (using the book “Charcuterie” by Ruhlman and Polcyn as our guide), we didn’t come across anything specific about ventilation for dry-curing meat. In our experience, the key elements were temperature and humidity.
useful reference how to start investing in crypto