
Summer Sausage, Pork Belly Confit and Pate, oh my! This is it — the very last Charcutepalooza challenge — “showing off,” in which we were tasked with putting the skills we’ve learned over the past year to work in a “celebration of all things charcuterie.” It’s hard to believe that it’s been a whole year since we tied raw duck breasts to the handle of the shop-vac in our garage in order to transform them into prosciutto, and that initial challenge would not be the only time I questioned what the heck we had gotten ourselves into this year. To be honest, I really didn’t think we would complete all 12 challenges — and there were months that I didn’t want to finish (Seafood Mousseline: you and I will never be friends) — but sticking with it and sharing our experiences here has given us a sense of accomplishment each month, especially during this year in which we have struggled with a few other, life-related challenges. As in life, there were a few disappointments along the journey (the duck prosciutto was not my favorite and I believe country pate is a taste I have yet to acquire), but also a couple of notable triumphs: we crave duck confit like almost nothing else we’ve ever cooked, and homemade bratwurst beats the pants off the store-bought variety. In addition to teaching us charcuterie techniques, this experience has also given us a greater appreciation for the satisfaction of making things from scratch at home (as well as a variety of new cooking toys and a freezer full of various home-cured meats to last well into the next year.) More than anything else, participating in Charcutepalooza has forced us out of our comfort zone in the kitchen — both in terms of cooking and eating — and we will always be thankful to Mrs. Wheelbarrow and The Yummy Mummy for founding Charcutepalooza and encouraging culinary creativity. We’ve enjoyed this “year of meat” and are a little sad to see it come to an end.
The challenging part of this month’s challenge was deciding what to make and how to serve it. We knew we would be making the 3-4 hour drive to my parents’ house for Thanksgiving and decided it would be fun to celebrate the end of this charcuterie year by sharing the fruits of our efforts with family. Our options for this final challenge included smoking, curing or brining a whole cut of meat, poultry or fish; drying or curing sausage; preparing pork belly in any variation; or making sausage, pate, terrine, mousseline, rillettes or confit. We wanted to make 3 things we’d never made before, but were concerned about incorporating them into a meal that might alienate anyone with a less adventurous palate, so we decided to go with the rather un-original (but always versatile) cheese plate to serve the night after Thanksgiving. We figured that people might be a little bored with turkey and would look forward to grazing on smoked/cured/ground/stuffed meats, a variety of cheeses, some fruit, good bread and crackers, etc. After much discussion and perusal of our Charcuterie book, we chose pork belly confit, summer sausage and chicken liver pate to incorporate into a cheese plate to share with my family for the final Charcutepalooza celebration.
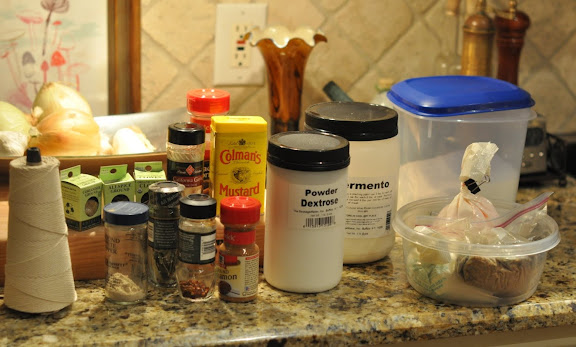
We researched the timing and figured out that the pork belly confit and the summer sausage would require the most time and preparation in advance of serving, so we made them both a couple of weeks prior to Thanksgiving. This is what just one of our counters looked like as a result of the effort. Not pictured — our KitchenAid with grinding attachments, sausage stuffer, various skillets and measuring devices, raw meat and implements of sanitation. It was a busy weekend in the kitchen.
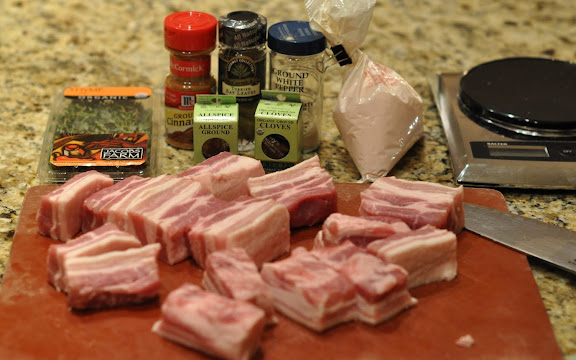
First up, pork belly confit. One of the reasons we chose this item of charcuterie is because we recently discovered an excellent and convenient source of pork belly (a huge Whole Foods “mother ship,” fairly close to our house.) Yet another product of Charcutepalooza — we never would have thought we’d be excited about being able to easily purchase pork belly. The second batch of homemade bacon portioned out in our freezer and the homemade pancetta we used in our vodka sauce for dinner tonight are proof-positive that easy access to pork belly is a very good thing. We followed Jim Drohman‘s recipe for pork belly confit (from our Charcuterie book), which calls for a dry cure made with ground black pepper, ground cinnamon, cloves and allspice, crumbled bay leaves, fresh thyme, kosher salt and pink salt.
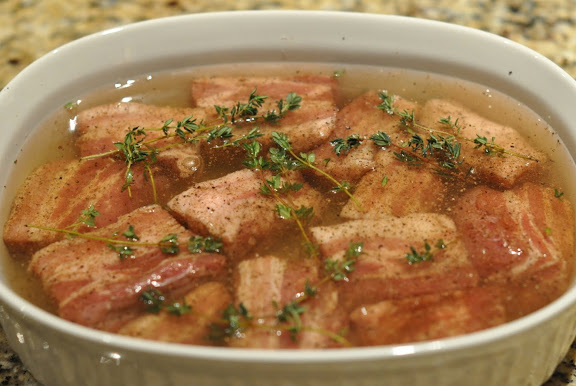
Combine the cure ingredients in a bowl, then toss the pork belly chunks with the cure until the pork is evenly coated. Place the pork belly in a glass or ceramic container and pour enough good white wine to completely cover the pork (have an even better bottle of white wine handy if you would also like to drink a glass — our pork required an entire bottle!) Cover the container and refrigerate for 24-36 hours.
Remove the pork from the cure, rinse each chunk and pat dry with paper towels. Place the pork in a Dutch oven and cover with rendered fat (we used “manteca” — basically a “meat fat/vegetable oil” shortening –heated on the stove until liquified), then bring the fat and pork combination to a simmer. Place the Dutch oven in the regular oven preheated to 250 degrees and cook, uncovered, until the pork is fork-tender — about 3 hours. When the pork is done, allow it to cool in the fat until it reaches room temperature. Then refrigerate the pork in the fat until it is completely chilled. We portioned ours into two containers — one to take for Thanksgiving and the other to keep in our fridge for the next couple of months and use as desired.
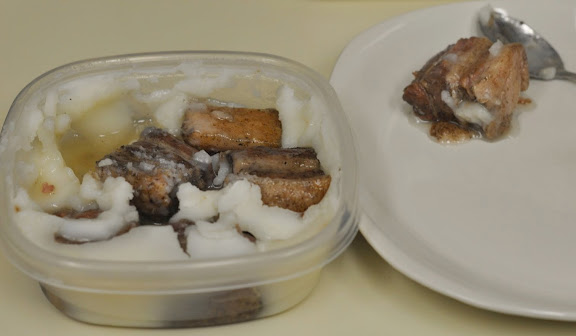
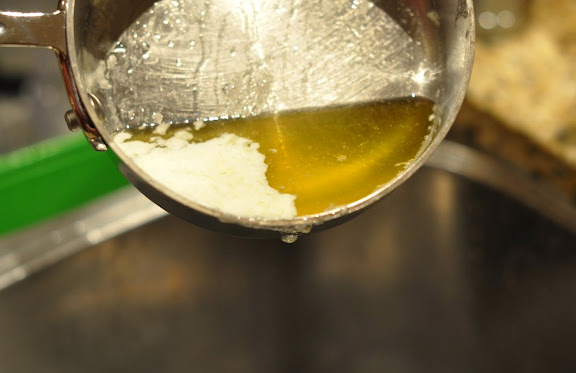
The chilled pork belly confit looks like it’s nestled in snow. But that is fat. It’s pretty easy to remove the pork belly from the fat — heat it in the microwave for about 1 minute, then scrape off the top layer of fat with a spoon and scoop out the delicate pig goodness.
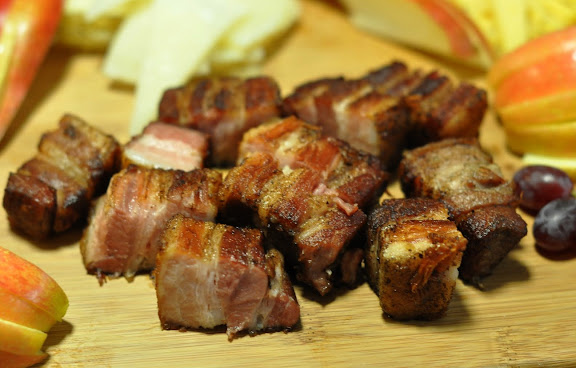
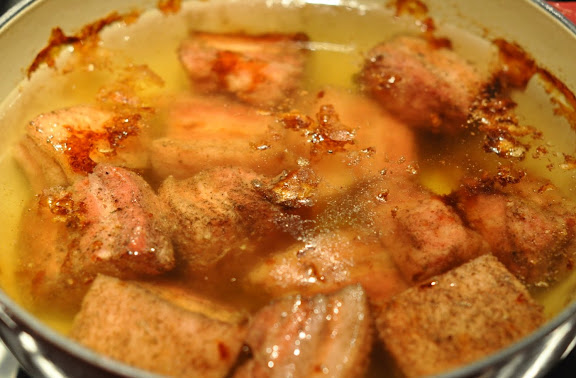
To finish the pork belly, fry over high heat until it is cooked through. The result is a little crispy on the outside with flaky tender pork inside and yummy bacon flavor throughout. It was savory and delicious dipped in a little coarse ground mustard. We look forward to trying it in a spinach salad tossed with a warm vinaigrette and topped with a poached egg.

Next up — summer sausage. Anybody else remember those Hillshire Farm meat/cheese variety packs gifted and received during the holidays? That was the summer sausage we were going for, and the recipe in the Charcuterie book delivered. Start by combining lean beef, pork shoulder butt, kosher salt, dextrose and pink salt, then grind the beef and pork through the large die into a bowl set in ice. Preparing summer sausage allowed Dan to purchase a new science item for the kitchen — “Fermento,” which is a starter culture for curing sausage. Dissolve the Fermento in water to make a thin paste, then add dry mustard, ground coriander, and garlic powder to the paste. Add the paste to the ground meat and mix it all together with the KitchenAid paddle attachment.
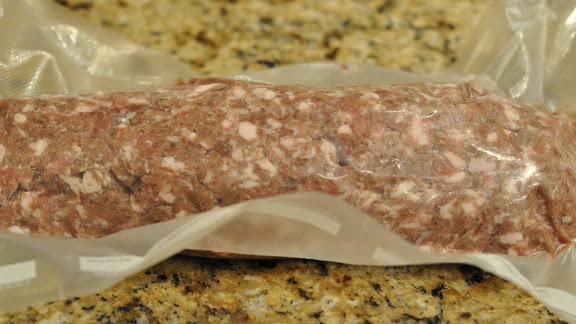
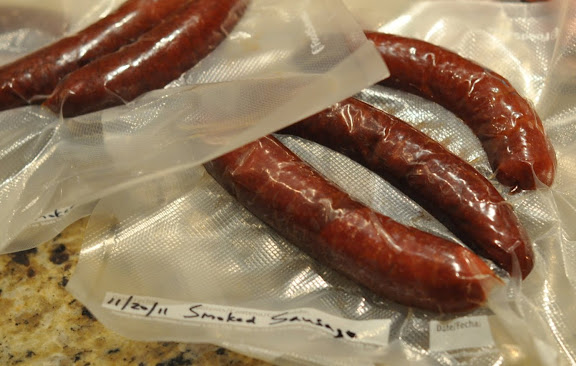
Pack the meat mixture into an airtight container (we vacuum sealed ours), such that no air touches the meat, and refrigerate for 2 days.

Regrind the meat through the small die, then saute a small piece to taste and adjust the seasonings if necessary.
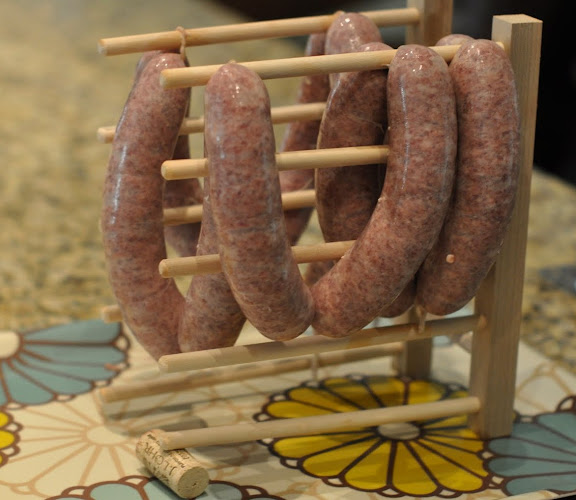
Stuff the meat mixture into casings, twist into links and hang the sausages to dry for about 10 hours at room temperature. We didn’t have the recommended “smoke sticks” on which to hang the sausages, so we improvised with a dish-drying rack from The Container Store, turned on its side (and supported on the low end by a spare wine cork.) Yet another lesson learned from Charcutepalooza — how to MacGyver ordinary items into charcuterie equipment.
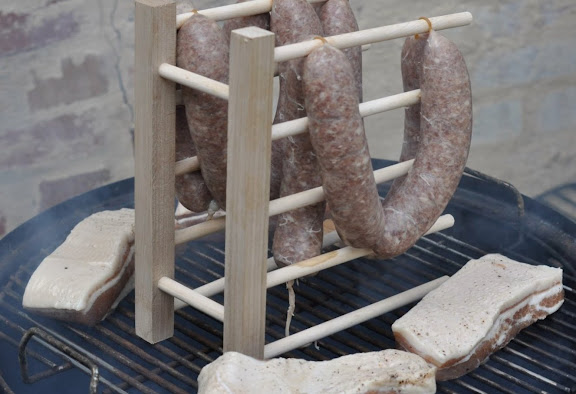
The recipe calls for cold-smoking the sausages for about 5 hours in order to get them nice and smoky before smoking them in the regular smoker. That’s a lot of smoke. But we don’t have a cold-smoker (Kudos to Dan for resisting the purchase of yet another Charcutepalooza toy), so instead we started the sausages (and some pork belly for bacon!) on the regular smoker with a very small amount of charcoal for about an hour.
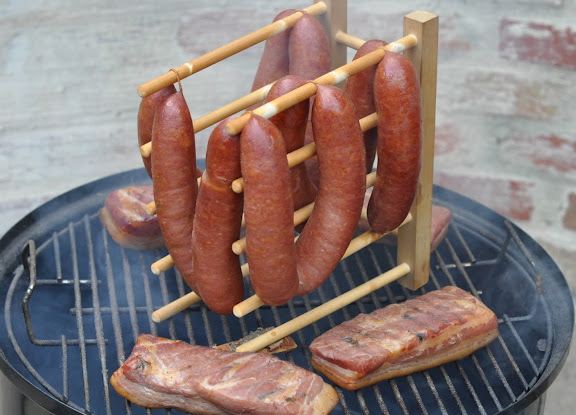
Next, we increased the amount of charcoal, got the smoker up to about 200 degrees and cooked the sausages until their internal temperature reached about 150 degrees — about 2 more hours.
Then we hung the smoked sausages at room temperature for about 2 hours until they “bloomed” and turned a deep mahogany color. Is this when they become “summer” sausage? Sort of like laying out in the sun until you get tan?
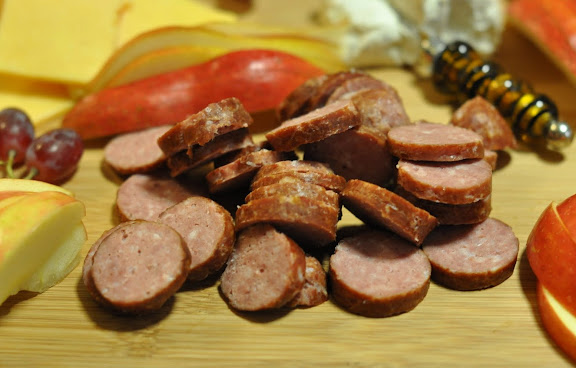
Who knows. All we know is that the smoky/beefy/salty flavor was even better than the kiosk-at-the-mall samples we remember from childhood. Suck it, Hillshire Farm!
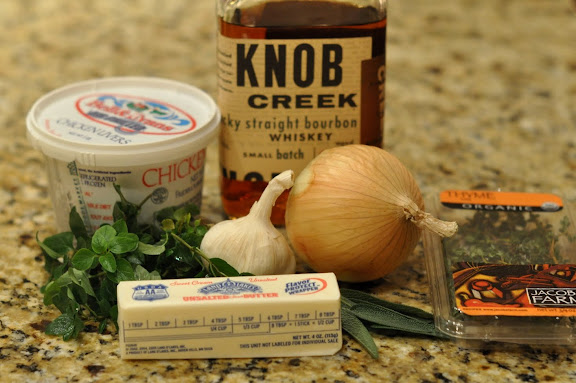
And finally — chicken liver pate to add to our celebratory cheese plate. We mostly followed The Yummy Mummy’s recipe, which is a non-recipe of sorts because she explains that it is so easy, it doesn’t need an actual recipe (also why we chose it.) The ingredients are very simple: chicken livers, onion, garlic, butter, herbs of your choice (we used thyme, oregano & sage) and whatever liquor you prefer. (Oh Bourbon, “brownest of the brown liquors…”)
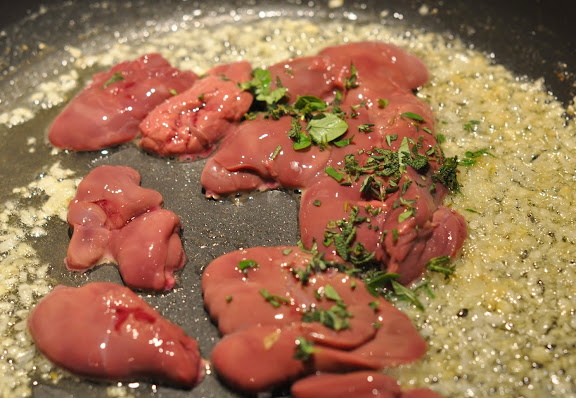
Saute the onions in butter until they barely begin to brown, then add the minced garlic and saute until fragrant. Add the chicken livers and herbs and continue to saute until browned on the outside and pink on the inside — about 5-6 minutes. (Charcutepalooza has also taught us that the process may not always be pretty, but the end result is almost always worth a little “ew” factor.)
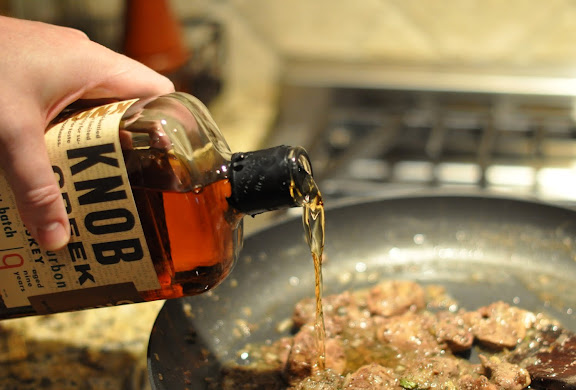
Add the bourbon or alcohol of your choice, then put the liver mixture in the food processor and pulse until it turns into the consistency of a thick shake. (Mmmmmm, liver shake.)
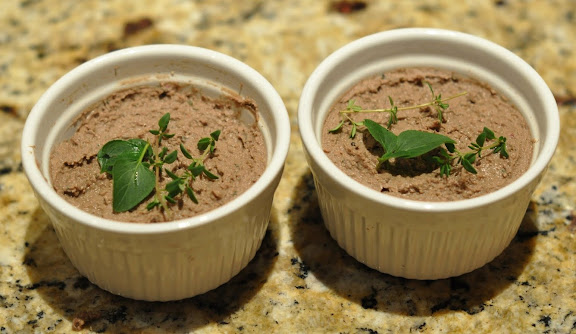
Place the pate into little pots or ramekens and sprinkle a few herbs on top.
Then cover the pate with a thin layer of clarified butter, which is surprisingly easy to make. Melt some butter over low heat until a white foamy layer appears on top. Remove the butter from the heat, then spoon off and discard the top layer (half is spooned off here.)
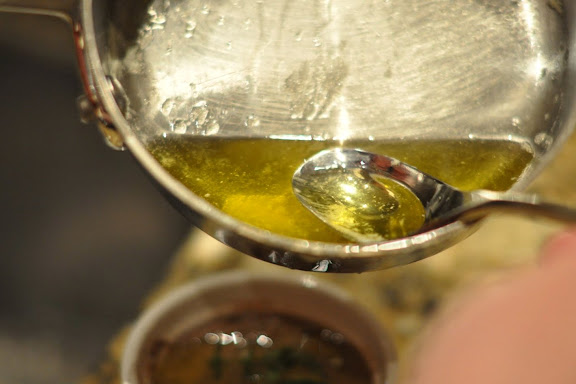
There is another layer of white stuff (water and milk solid) that sinks to the bottom of the pan. The middle “butterfat” layer is what you want — spoon it out away from the white layer in the bottom of the pan and drizzle a thin layer over the top of the pate. Refrigerate the pate for several hours before serving.
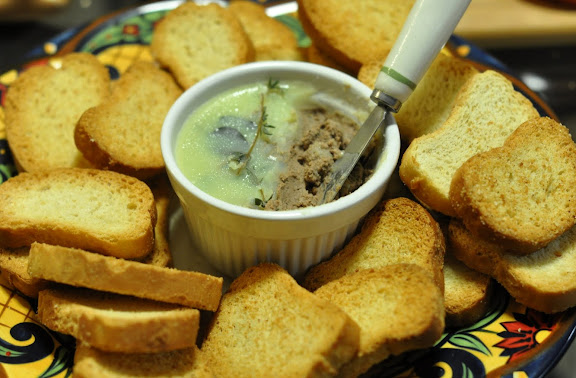
We served ours with toasted baguettes and removed the layer of clarified butter from one half of the pate, in case anyone didn’t want the extra butter. Turns out that pretty much everyone who tasted it agreed that it was better with the butter. Few things in life aren’t better with butter, yes?
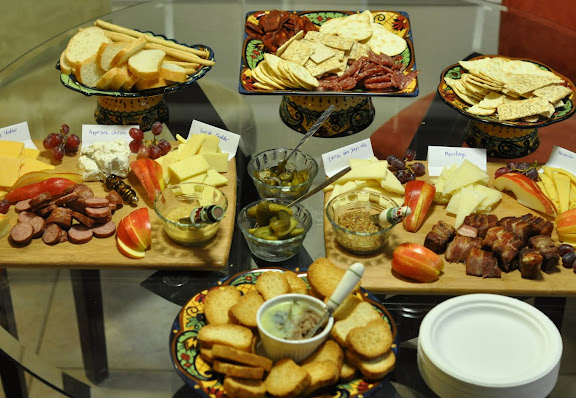
Behold, our charcuterie celebration in all its glory! It turned out to be more of an entire “cheese table” rather than a cheese plate, but very festive and delicious. (Ignore the salami and Spanish chorizo at the top of the photo — those are store-bought. We had not yet sampled our own home-cured salami to make sure it wouldn’t poison anyone. Nothing quite says “Happy Thanksgiving” like a trip to the ER with food poisoning…) We are so thankful for all of our family and were happy to be able to share our charcuterie efforts with loved ones over the Thanksgiving holiday. We’re also grateful for anyone still reading this post, as well as our readers and commenters who indulged us by reading about all our prior Charcutepalooza challenges. Now that the year of meat has come to an end, we kind of don’t know what to do with ourselves without a kitchen project to tackle each month. Anybody up for a Cheesestravaganza next year? How about a year of pickling things — Picklepetition? Twelve months of making homemade jam in a Jambilee? Clearly, we’re going to need a new hobby of some sort…
What a beautiful spread. You’ve inspired me to tackle summer sausage!
Nice work!
You can cold smoke in your kettle grill. Put some sawdust (oak, cherry, etc. but not anything pine-y) in the bottom of a coffee can, insert a plugged-in soldering iron, and let the sawdust smolder with the kettle lid and vents closed. Works well, costs less than $20.
You made such a beautiful array of tasty-looking food, well done! You also made me giggle and wag my head in recognition –me and mousseline didn’t bond either! It’s been a pleasure taking the Charcutepalooza ride alongside you 🙂
I think “Suck it, Hillshire Farms.” might be my favorite quote from all of Charcutepalooza. Great post.
I agree. It is a perfect sentiment and a great post.
Congratulations on being in contention to win the contest! (If I understand correctly) We are rooting for you since we have been inspired by your blog for quite some time. You make a great team.
Thanks Mark! You are too kind. We didn’t win, but enjoyed the experience. The best compliment we can receive is that our blog inspires others to cook — we’re so glad to hear it!